Polar Dish Mount
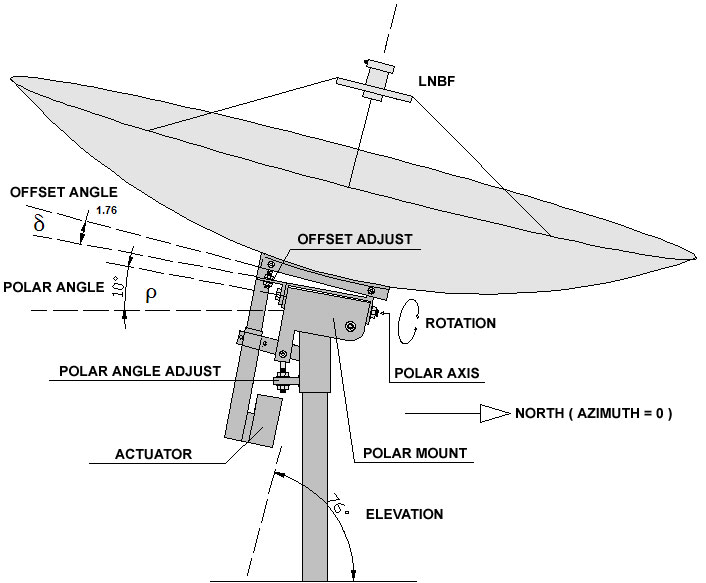
Polar dish mount is a antenna mechanism permitting steering in both elevation and azimuth through rotation about a single axis. While an astronomer's polar mount has its axis parallel to that of the earth, satellite earth stations utilize a modified polar mount geometry that incorporates a declination offset.
Dish mount is designed is such a way that as it moves through its azimuth range, the elevation changes to match the arc of satellites in the sky. This is a more complex mount to design and install, but it is simpler to operate because it only uses one motor.
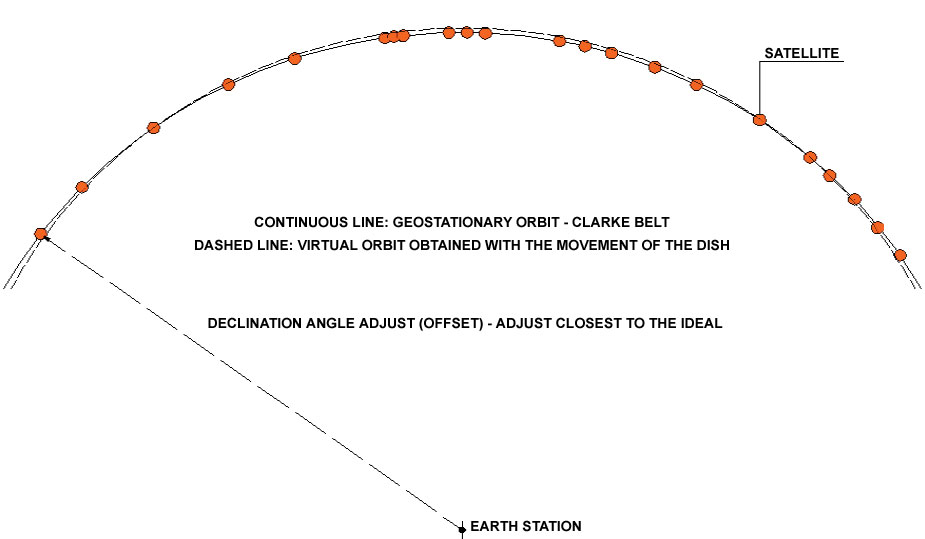
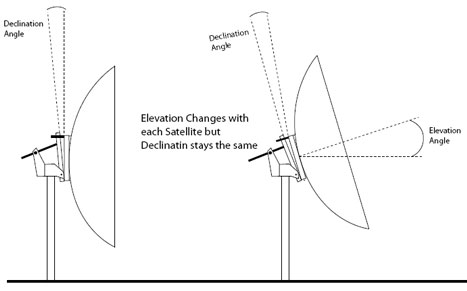
On a polar dish mount, you will find a declination adjustment that is only used during installation; this rotates the entire dish mount in an arc, similar to elevation adjustments. Normally, the look angle of the dish would be parallel to the elevation adjustment frame so the two would always match elevation angles, but here a declination adjustment is found that allows for an offset between the elevation adjustment frames angle and the dish's look angle. This is only adjusted at the time of installation. As the dish installation site moves north from the equator, the arc it must follow to match the satellites in the Clarke Belt changes in shape.

Declination is the adjustment used to compensate for this change in the arc due to latitude. The range is from 1 degree near the equator to 8.5 degrees near the North Pole. The dish actually rotates on the elevation adjustment frames axis angle.
This is an important adjustment that many installers misalign. When not adjusted correctly, the satellites at the zenith of the arc may be correct, but incorrect at either end of the arc.
Polar and HH-Motor Setup
Polar dishes use a drive screw that pushes or pulls the dish through its arc. There is a standard setup where polar dishes have the actuator arm (screw) placed on the west side (viewed from the back) of a dish installed in the eastern half of the United States (linear west) and on the east side of the dish in the western half (linear east). This allows the actuator arm to push the dish up the arc and lets gravity help pull it down. In the eastern United States, most satellites are higher toward the west and reversed in the western United States.
To set up a polar dish, its mounting pole must be exactly plum, because any tilt will throw off the dish alignment as it moves through the arc. The next step is to move the dish to its highest elevation or zenith and aim due south, or 180 degrees on a corrected compass heading. Keep in mind that compasses will always display an error due to magnetic variations in the Earth. To compensate for this, you must add a correction factor, for your area, to your compass reading to obtain a true north-south heading. Many online Web sites carry such information.
For example, pick a satellite that shares the same longitude in the Clarke Belt as the dish longitude. If the dish was located in Kansas City, its longitude would be 94 degrees, and at 94 degrees west in the Clarke Belt we find GALAXY 3C and APACEWAY 3. With the dish at its highest elevation in its polar arc, adjust its declination angle to the value on the chart; in this case, Kansas City's latitude is 39 degree and declination is 6.14 degree. The declination angle always causes the dish elevation to be lower. With declination set, adjust the elevation frame until the dish, not the frame, is at the correct elevation in this case, 44.7 degrees. At this point, small adjustments can be made to elevation, but not declination, and rotating the dish on its pole should bring in the best possible signal. Once that is accomplished and the dish is fixed to the pole, find a satellite at either end of the arc and check to see if you get a good signal from them. A small adjustment of the dish east or west (rotating it on its pole just a little) should be all that is necessary. Once you have good signals from satellites at the peak and either end of the dish arc, lock down the all adjustments. Note that the arc is rather flat at the zenith and small adjustments east-west will not affect reception very much. Now the dish will see every satellite within its arc; the controller just has to remember the position of the dish at each satellite.
HH setup is very similar. These dish mounts use a chain drive on a half circle frame to rotate the dish through its arc. Declination is set in the same way as above. Some HH dish mounts have a second motor used for declination adjustment to track inclined orbiting satellites. Once again, the declination adjustment must be set at installation as above for it to be able to properly track all the satellites in the Clarke Belt. If you do not track inclined orbiting satellites, you will have no need to adjust this further. Otherwise, you need a way to track any movement of this declination motor so it can be repositioned back to its normal setting so the dish will track the satellite arc correctly.
Now we come to the hardest part of the installation. If you pay close attention to the following procedures it will pay off in the long run with better reception on Ku-Band and weaker C-Band satellites.
Three adjustments are required to ensure proper tracking of the arc: azimuth, elevation and declination offset angle. These parameters should be set while the dish is aimed toward its highest position, namely towards the southern-most satellite.
The azimuth must be set right in order to detect all the satellites in the viewable arc. Most dishes have a flat plate on the mount that can be used as a sighting reference. A hand-held compass is the most effective type for lining up the mount. Remember that a correction for magnetic variation is necessary. Add magnetic variation to the compass heading for west magnetic variation; subtract for east.
The polar axis angle or inclination angle is within fractions of the site latitude. Most mounts have one or two long threaded rods that are used to adjust the polar axis angle. An inclinometer resting on the axis bar or back part of the mount is used to set this angle.
Declination angle for normal mounts may be found by using the following equation:
Angle = ARCTAN((3964*SIN(L)/(22300+3964(1-COS(L)))))
Where 'L' is your site latitude.
Determine the latitude of the installation local. Find city Latitude with this utility. Below is a table where you can look up the declination offset angle for your latitude.
Declination Offset Angle Chart.
This table is for traditional polar mount adjustment.
| Lat | Angle | Lat | Angle | Lat | Angle | Lat | Angle |
| 1 | 0.18 | 23 | 3.92 | 45 | 6.81 | 67 | 8.40 |
| 2 | 0.36 | 24 | 4.07 | 46 | 6.92 | 68 | 8.44 |
| 3 | 0.53 | 25 | 4.23 | 47 | 7.01 | 69 | 8.47 |
| 4 | 0.71 | 26 | 4.38 | 48 | 7.11 | 70 | 8.51 |
| 5 | 0.89 | 27 | 4.53 | 49 | 7.21 | 71 | 8.54 |
| 6 | 1.06 | 28 | 4.67 | 50 | 7.30 | 72 | 8.56 |
| 7 | 1.24 | 29 | 4.82 | 51 | 7.38 | 73 | 8.59 |
| 8 | 1.41 | 30 | 4.96 | 52 | 7.47 | 74 | 8.61 |
| 9 | 1.59 | 31 | 5.10 | 53 | 7.55 | 75 | 8.63 |
| 10 | 1.76 | 32 | 5.24 | 54 | 7.63 | 76 | 8.64 |
| 11 | 1.94 | 33 | 5.38 | 55 | 7.71 | 77 | 8.66 |
| 12 | 2.11 | 34 | 5.51 | 56 | 7.78 | 78 | 8.67 |
| 13 | 2.28 | 35 | 5.64 | 57 | 7.85 | 79 | 8.67 |
| 14 | 2.45 | 36 | 5.77 | 58 | 7.92 | 80 | 8.68 |
| 15 | 2.62 | 37 | 5.90 | 59 | 7.99 | 81 | 8.68 |
| 16 | 2.79 | 38 | 6.02 | 60 | 8.05 | 82 | 8.68 |
| 17 | 2.95 | 39 | 6.14 | 61 | 8.11 | 83 | 8.68 |
| 18 | 3.12 | 40 | 6.26 | 62 | 8.16 | 84 | 8.67 |
| 19 | 3.28 | 41 | 6.38 | 63 | 8.22 | 85 | 8.66 |
| 20 | 3.44 | 42 | 6.49 | 64 | 8.27 | 86 | 8.65 |
| 21 | 3.60 | 43 | 6.60 | 65 | 8.31 | 87 | 8.64 |
| 22 | 3.76 | 44 | 6.71 | 66 | 8.36 | 88 | 8.62 |
Setting the Polar Axis Angle
The polar axis angle is set by placing an inclinometer on the polar bar and then raising or lowering the dish to that angle.
The declination offset adjustment lowers the sight of a dish to the arc of the satellites. Declination is greater in locations farther away from the equator. Just like the offset angle, it is measured with an inclinometer. The difference between the two readings, one on the main bar, and one on a flat spot on the back of the dish, should be equal to the declination offset. The easiest way to set the declination offset is with an inclinometer placed on the back surface that is parallel with the face of the dish. Or via a flat board placed in a vertical direction spanning the rims. This reading should be equal to the sum of the polar axis and declination angles.

Setting the Declination Angle
The declination angle is set by placing an inclinometer on a flat service of the dish that is parallel to the line between the rims and adjusting the declination bolts.
Using the Dish face to set a Declination Angle
If a flat surface cannot be found on the rear of the dish or on the hardware that supports the declination adjustment, the declination angle can be set by placing an inclinometer on a flat board that rests on the face of the dish.
When the declination is properly set, the procedure is to set the dish to true south (not magnetic south). You need to compensate and use the polar axis adjustment to capture the southernmost satellite visible from your location. This is called the zenith satellite. Once you are peaked at the southernmost satellite you can use the actuator control on your receiver to move the dish to the lowest satellite off the horizon you can see. This is called the extreme satellite.
Once you have located the extreme satellite, gently push up and down on the edge of the dish to see which direction helps clear up the picture. If pushing down on the lip of the dish clears up the picture, then you need to rotate the polar mount counterclockwise. If pushing up on the lip of the dish clears up the picture, then you need to rotate the polar mount clockwise on the pole.

After you have made the azimuth adjustment, return the dish to the southernmost satellite and use the elevation adjustment to clear the picture up. Keep moving back and forth
between the extreme satellite and the zenith satellite using the polar adjustment and the elevation adjustment respectively until the dish tracks the arc.
TrackingSat GPS - Satellite Dish Alignment Tools.
TrackingSat is useful to assist users that need to install
your antenna and align it with the satellites in orbit.
If you want to exchange links to increase PR, contact us.
Satellite Dish Alignment Tools
